Thursday, 5 December 2019

How do I fetch multiple columns for use in a cursor loop?

Here is slightly modified version. Changes are noted as code commentary.
BEGIN TRANSACTION

declare @cnt int
declare @test nvarchar(128)
-- variable to hold table name
declare @tableName nvarchar(255)
declare @cmd nvarchar(500) 
-- local means the cursor name is private to this code
-- fast_forward enables some speed optimizations
declare Tests cursor local fast_forward for
 SELECT COLUMN_NAME, TABLE_NAME
   FROM INFORMATION_SCHEMA.COLUMNS 
  WHERE COLUMN_NAME LIKE 'pct%' 
    AND TABLE_NAME LIKE 'TestData%'

open Tests
-- Instead of fetching twice, I rather set up no-exit loop
while 1 = 1
BEGIN
  -- And then fetch
  fetch next from Tests into @test, @tableName
  -- And then, if no row is fetched, exit the loop
  if @@fetch_status <> 0
  begin
     break
  end
  -- Quotename is needed if you ever use special characters
  -- in table/column names. Spaces, reserved words etc.
  -- Other changes add apostrophes at right places.
  set @cmd = N'exec sp_rename ''' 
           + quotename(@tableName) 
           + '.' 
           + quotename(@test) 
           + N''',''' 
           + RIGHT(@test,LEN(@test)-3) 
           + '_Pct''' 
           + N', ''column''' 

  print @cmd

  EXEC sp_executeSQL @cmd
END

close Tests 
deallocate Tests

ROLLBACK TRANSACTION
--COMMIT TRANSACTION

MySQL Query - Records between Today and Last 30 Days

You need to apply DATE_FORMAT in the SELECT clause, not the WHERE clause:
SELECT  DATE_FORMAT(create_date, '%m/%d/%Y')
FROM    mytable
WHERE   create_date BETWEEN CURDATE() - INTERVAL 30 DAY AND CURDATE()
Also note that CURDATE() returns only the DATE portion of the date, so if you store create_date as a DATETIME with the time portion filled, this query will not select the today's records.
In this case, you'll need to use NOW instead:
SELECT  DATE_FORMAT(create_date, '%m/%d/%Y')
FROM    mytable
WHERE   create_date BETWEEN NOW() - INTERVAL 30 DAY AND NOW()

MySQL count occurrences greater than 2

To get a list of the words that appear more than once together with how often they occur, use a combination of GROUP BY and HAVING:
SELECT word, COUNT(*) AS cnt
FROM words
GROUP BY word
HAVING cnt > 1
To find the number of words in the above result set, use that as a subquery and count the rows in an outer query:
SELECT COUNT(*)
FROM
(
    SELECT NULL
    FROM words
    GROUP BY word
    HAVING COUNT(*) > 1
) T1

INSERT ON DUPLICATE KEY UPDATE

https://mariadb.com/kb/en/library/insert-on-duplicate-key-update/

Syntax

INSERT [LOW_PRIORITY | DELAYED | HIGH_PRIORITY] [IGNORE]
  [INTO] tbl_name [PARTITION (partition_list)] [(col,...)]
  {VALUES | VALUE} ({expr | DEFAULT},...),(...),...
  [ ON DUPLICATE KEY UPDATE
    col=expr
      [, col=expr] ... ]
Or:
INSERT [LOW_PRIORITY | DELAYED | HIGH_PRIORITY] [IGNORE]
    [INTO] tbl_name [PARTITION (partition_list)]
    SET col={expr | DEFAULT}, ...
    [ ON DUPLICATE KEY UPDATE
      col=expr
        [, col=expr] ... ]
Or:
INSERT [LOW_PRIORITY | HIGH_PRIORITY] [IGNORE]
    [INTO] tbl_name [PARTITION (partition_list)] [(col,...)]
    SELECT ...
    [ ON DUPLICATE KEY UPDATE
      col=expr
        [, col=expr] ... ]

Description

INSERT ... ON DUPLICATE KEY UPDATE is a MariaDB/MySQL extension to the INSERT statement that, if it finds a duplicate unique or primary key, will instead perform an UPDATE.
The row/s affected value is reported as 1 if a row is inserted, and 2 if a row is updated, unless the API's CLIENT_FOUND_ROWS flag is set.
If more than one unique index is matched, only the first is updated. It is not recommended to use this statement on tables with more than one unique index.
If the table has an AUTO_INCREMENT primary key and the statement inserts or updates a row, the LAST_INSERT_ID() function returns its AUTO_INCREMENT value.
The VALUES() function can only be used in a ON DUPLICATE KEY UPDATE clause and has no meaning in any other context. It returns the column values from the INSERT portion of the statement. This function is particularly useful for multi-rows inserts.
The IGNORE and DELAYED options are ignored when you use ON DUPLICATE KEY UPDATE.
MariaDB starting with 10.0
The PARTITION clause was introduced in MariaDB 10.0. See Partition Pruning and Selection for details.
This statement activates INSERT and UPDATE triggers. See Trigger Overview for details.
See also a similar statement, REPLACE.

Examples

CREATE TABLE ins_duplicate (id INT PRIMARY KEY, animal VARCHAR(30));
INSERT INTO ins_duplicate VALUES (1,'Aardvark'), (2,'Cheetah'), (3,'Zebra');
If there is no existing key, the statement runs as a regular INSERT:
INSERT INTO ins_duplicate VALUES (4,'Gorilla') ON DUPLICATE KEY UPDATE animal='Gorilla';
Query OK, 1 row affected (0.07 sec)
SELECT * FROM ins_duplicate;
+----+----------+
| id | animal   |
+----+----------+
|  1 | Aardvark |
|  2 | Cheetah  |
|  3 | Zebra    |
|  4 | Gorilla  |
+----+----------+
A regular INSERT with a primary key value of 1 will fail, due to the existing key:
INSERT INTO ins_duplicate VALUES (1,'Antelope');
ERROR 1062 (23000): Duplicate entry '1' for key 'PRIMARY'
However, we can use an INSERT ON DUPLICATE KEY UPDATE instead:
INSERT INTO ins_duplicate VALUES (1,'Antelope') ON DUPLICATE KEY UPDATE animal='Antelope';
Query OK, 2 rows affected (0.09 sec)
Note that there are two rows reported as affected, but this refers only to the UPDATE.
SELECT * FROM ins_duplicate;
+----+----------+
| id | animal   |
+----+----------+
|  1 | Antelope |
|  2 | Cheetah  |
|  3 | Zebra    |
|  4 | Gorilla  |
+----+----------+
Adding a second unique column:
ALTER TABLE ins_duplicate ADD id2 INT;
UPDATE ins_duplicate SET id2=id+10;
ALTER TABLE ins_duplicate ADD UNIQUE KEY(id2);
Where two rows match the unique keys match, only the first is updated. This can be unsafe and is not recommended unless you are certain what you are doing. Note that the warning shown below appears in MariaDB 5.5 and before, but has been removed in MariaDB 10.0, as MariaDB now assumes that the keys are checked in order, as shown in SHOW CREATE TABLE.
INSERT INTO ins_duplicate VALUES (2,'Lion',13) ON DUPLICATE KEY UPDATE animal='Lion';
Query OK, 2 rows affected, 1 warning (0.06 sec)

SHOW WARNINGS;
+-------+------+------------------------------------------------------------------------------------------------------------------------------------------------------------------------------------------+
| Level | Code | Message                                                                                                                                                                                  |
+-------+------+------------------------------------------------------------------------------------------------------------------------------------------------------------------------------------------+
| Note  | 1592 | Unsafe statement written to the binary log using statement format since BINLOG_FORMAT = STATEMENT. INSERT... ON DUPLICATE KEY UPDATE  on a table with more than one UNIQUE KEY is unsafe |
+-------+------+------------------------------------------------------------------------------------------------------------------------------------------------------------------------------------------+

SELECT * FROM ins_duplicate;
+----+----------+------+
| id | animal   | id2  |
+----+----------+------+
|  1 | Antelope |   11 |
|  2 | Lion     |   12 |
|  3 | Zebra    |   13 |
|  4 | Gorilla  |   14 |
+----+----------+------+
Although the third row with an id of 3 has an id2 of 13, which also matched, it was not updated.
Changing id to an auto_increment field. If a new row is added, the auto_increment is moved forward. If the row is updated, it remains the same.
ALTER TABLE `ins_duplicate` CHANGE `id` `id` INT( 11 ) NOT NULL AUTO_INCREMENT;
ALTER TABLE ins_duplicate DROP id2;
SELECT Auto_increment FROM INFORMATION_SCHEMA.TABLES WHERE TABLE_NAME='ins_duplicate';
+----------------+
| Auto_increment |
+----------------+
|              5 |
+----------------+

INSERT INTO ins_duplicate VALUES (2,'Leopard') ON DUPLICATE KEY UPDATE animal='Leopard';
Query OK, 2 rows affected (0.00 sec)

SELECT Auto_increment FROM INFORMATION_SCHEMA.TABLES WHERE TABLE_NAME='ins_duplicate';
+----------------+
| Auto_increment |
+----------------+
|              5 |
+----------------+

INSERT INTO ins_duplicate VALUES (5,'Wild Dog') ON DUPLICATE KEY UPDATE animal='Wild Dog';
Query OK, 1 row affected (0.09 sec)

SELECT * FROM ins_duplicate;
+----+----------+
| id | animal   |
+----+----------+
|  1 | Antelope |
|  2 | Leopard  |
|  3 | Zebra    |
|  4 | Gorilla  |
|  5 | Wild Dog |
+----+----------+

SELECT Auto_increment FROM INFORMATION_SCHEMA.TABLES WHERE TABLE_NAME='ins_duplicate';
+----------------+
| Auto_increment |
+----------------+
|              6 |
+----------------+
Refering to column values from the INSERT portion of the statement:
INSERT INTO table (a,b,c) VALUES (1,2,3),(4,5,6)
    ON DUPLICATE KEY UPDATE c=VALUES(a)+VALUES(b);
See the VALUES() function for more.

INSERT IGNORE

https://mariadb.com/kb/en/library/insert-ignore/

Ignoring Errors

Normally INSERT stops and rolls back when it encounters an error.
By using the IGNORE keyword all errors are converted to warnings, which will not stop inserts of additional rows.
The IGNORE and DELAYED options are ignored when you use ON DUPLICATE KEY UPDATE.

Incompatibilities

MariaDB until 5.5.28
  • MySQL and MariaDB before 5.5.28 didn't give warnings for duplicate key errors when using IGNORE. You can get the old behaviour if you set OLD_MODE to NO_DUP_KEY_WARNINGS_WITH_IGNORE

Examples

CREATE TABLE t1 (x INT UNIQUE);

INSERT INTO t1 VALUES(1),(2);

INSERT INTO t1 VALUES(2),(3);
ERROR 1062 (23000): Duplicate entry '2' for key 'x'
SELECT * FROM t1;
+------+
| x    |
+------+
|    1 |
|    2 |
+------+
2 rows in set (0.00 sec)

INSERT IGNORE INTO t1 VALUES(2),(3);
Query OK, 1 row affected, 1 warning (0.04 sec)

SHOW WARNINGS;
+---------+------+---------------------------------+
| Level   | Code | Message                         |
+---------+------+---------------------------------+
| Warning | 1062 | Duplicate entry '2' for key 'x' |
+---------+------+---------------------------------+

SELECT * FROM t1;
+------+
| x    |
+------+
|    1 |
|    2 |
|    3 |
+------+
See INSERT ON DUPLICATE KEY UPDATE for further examples using that syntax.

MySQL - Handling Duplicates

https://www.tutorialspoint.com/mysql/mysql-handling-duplicates.htm

Preventing Duplicates from Occurring in a Table

You can use a PRIMARY KEY or a UNIQUE Index on a table with the appropriate fields to stop duplicate records.
Let us take an example – The following table contains no such index or primary key, so it would allow duplicate records for first_name and last_name.
CREATE TABLE person_tbl (
   first_name CHAR(20),
   last_name CHAR(20),
   sex CHAR(10)
);
To prevent multiple records with the same first and last name values from being created in this table, add a PRIMARY KEY to its definition. When you do this, it is also necessary to declare the indexed columns to be NOT NULL, because a PRIMARY KEY does not allow NULL values −
CREATE TABLE person_tbl (
   first_name CHAR(20) NOT NULL,
   last_name CHAR(20) NOT NULL,
   sex CHAR(10),
   PRIMARY KEY (last_name, first_name)
);
The presence of a unique index in a table normally causes an error to occur if you insert a record into the table that duplicates an existing record in the column or columns that define the index.
Use the INSERT IGNORE command rather than the INSERT command. If a record doesn't duplicate an existing record, then MySQL inserts it as usual. If the record is a duplicate, then the IGNORE keyword tells MySQL to discard it silently without generating an error.
The following example does not error out and at the same time it will not insert duplicate records as well.
mysql> INSERT IGNORE INTO person_tbl (last_name, first_name)
   -> VALUES( 'Jay', 'Thomas');
Query OK, 1 row affected (0.00 sec)

mysql> INSERT IGNORE INTO person_tbl (last_name, first_name)
   -> VALUES( 'Jay', 'Thomas');
Query OK, 0 rows affected (0.00 sec)
Use the REPLACE command rather than the INSERT command. If the record is new, it is inserted just as with INSERT. If it is a duplicate, the new record replaces the old one.
mysql> REPLACE INTO person_tbl (last_name, first_name)
   -> VALUES( 'Ajay', 'Kumar');
Query OK, 1 row affected (0.00 sec)

mysql> REPLACE INTO person_tbl (last_name, first_name)
   -> VALUES( 'Ajay', 'Kumar');
Query OK, 2 rows affected (0.00 sec)
The INSERT IGNORE and REPLACE commands should be chosen as per the duplicate-handling behavior you want to effect. The INSERT IGNORE command keeps the first set of the duplicated records and discards the remaining. The REPLACE command keeps the last set of duplicates and erases out any earlier ones.
Another way to enforce uniqueness is to add a UNIQUE index rather than a PRIMARY KEY to a table.
CREATE TABLE person_tbl (
   first_name CHAR(20) NOT NULL,
   last_name CHAR(20) NOT NULL,
   sex CHAR(10)
   UNIQUE (last_name, first_name)
);

Counting and Identifying Duplicates

Following is the query to count duplicate records with first_name and last_name in a table.
mysql> SELECT COUNT(*) as repetitions, last_name, first_name
   -> FROM person_tbl
   -> GROUP BY last_name, first_name
   -> HAVING repetitions > 1;
This query will return a list of all the duplicate records in the person_tbl table. In general, to identify sets of values that are duplicated, follow the steps given below.
  • Determine which columns contain the values that may be duplicated.
  • List those columns in the column selection list, along with the COUNT(*).
  • List the columns in the GROUP BY clause as well.
  • Add a HAVING clause that eliminates the unique values by requiring the group counts to be greater than one.

Eliminating Duplicates from a Query Result

You can use the DISTINCT command along with the SELECT statement to find out unique records available in a table.
mysql> SELECT DISTINCT last_name, first_name
   -> FROM person_tbl
   -> ORDER BY last_name;
An alternative to the DISTINCT command is to add a GROUP BY clause that names the columns you are selecting. This has the effect of removing duplicates and selecting only the unique combinations of values in the specified columns.
mysql> SELECT last_name, first_name
   -> FROM person_tbl
   -> GROUP BY (last_name, first_name);

Removing Duplicates Using Table Replacement

If you have duplicate records in a table and you want to remove all the duplicate records from that table, then follow the procedure given below.
mysql> CREATE TABLE tmp SELECT last_name, first_name, sex
   -> FROM person_tbl;
   -> GROUP BY (last_name, first_name);

mysql> DROP TABLE person_tbl;
mysql> ALTER TABLE tmp RENAME TO person_tbl;
An easy way of removing duplicate records from a table is to add an INDEX or a PRIMARY KEY to that table. Even if this table is already available, you can use this technique to remove the duplicate records and you will be safe in future as well.
mysql> ALTER IGNORE TABLE person_tbl
   -> ADD PRIMARY KEY (last_name, first_name);

Monday, 14 October 2019

Setting up an HTTP/HTTPS redirect in IIS

https://www.namecheap.com/support/knowledgebase/article.aspx/9953/38/iis-redirect-http-to-https 


 IIS Redirect HTTP to HTTPS

Setting up an HTTP/HTTPS redirect in IIS

Once the SSL certificate is installed, your site still remains accessible via a regular insecure HTTP connection. To connect securely, visitors must specify the https:// prefix manually when entering your site’s address in their browsers.
In order to force a secure connection on your website, it is necessary to set up a certain HTTP/HTTPS redirection rule. This way, anyone who enters your site using a link like “yourdomain.com” will be redirected to “https://yourdomain.com” or “https://www.yourdomain.com” (depending on your choice) making the traffic encrypted between the server and the client side.
Below are steps to setup a IIS HTTPS redirect:
  1. Download and install the URL Rewrite module.
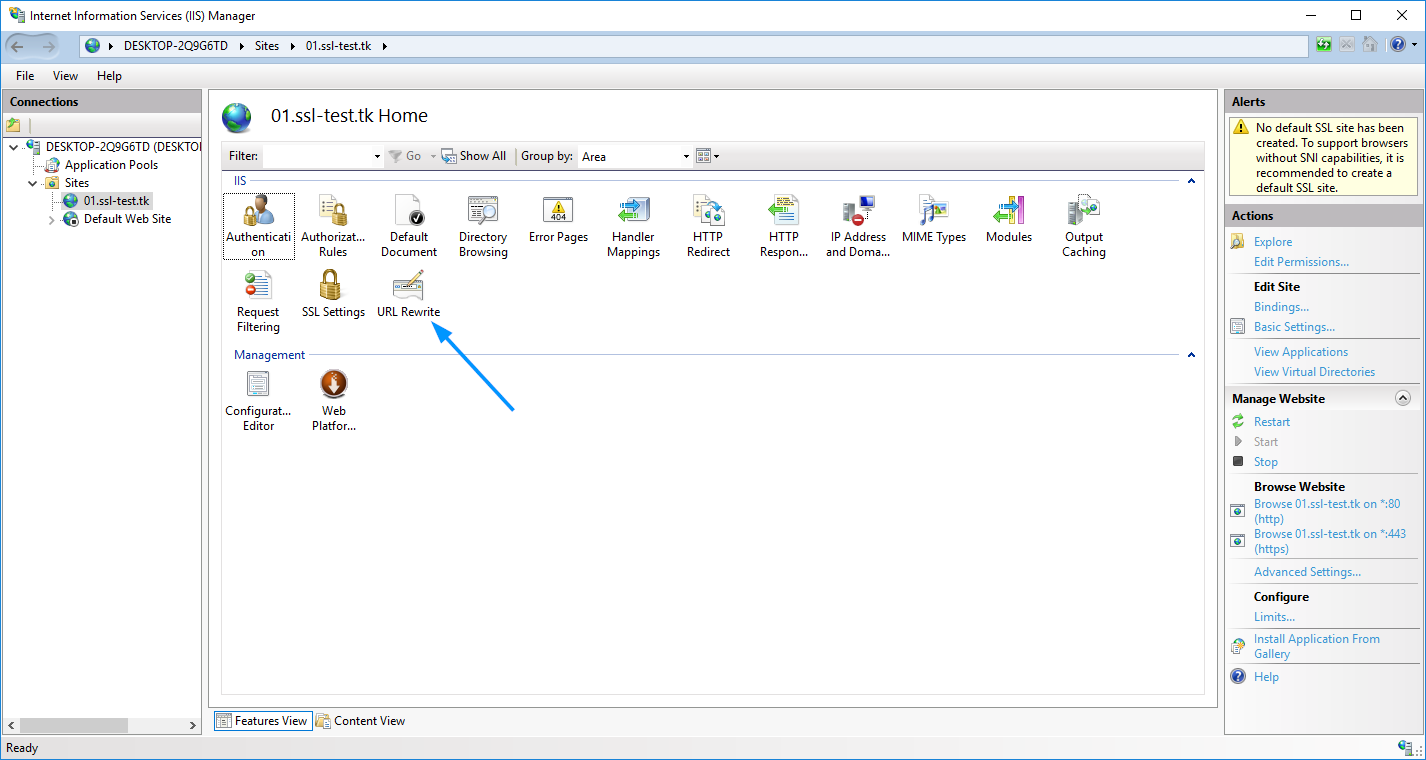
  2. Open the IIS Manager console and select the website you would like to apply the redirection to in the left-side menu:
    iisred1
  3. Double-click on the URL Rewrite icon.
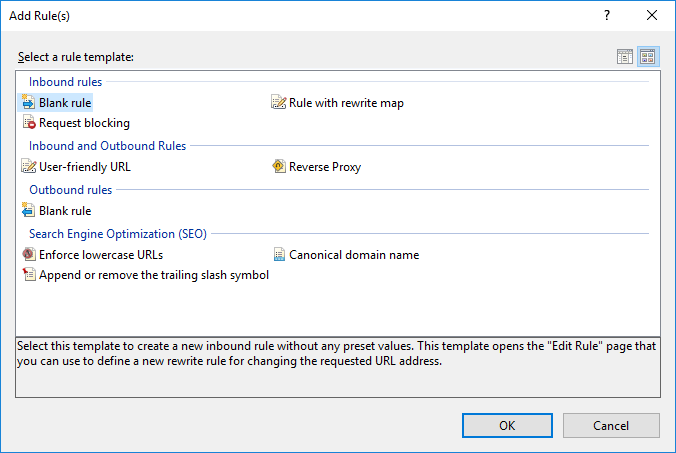
  4. Click Add Rule(s) in the right-side menu.
  5. Select Blank Rule in the Inbound section, then press OK.
    iisred2
  6. Enter any rule name you wish.
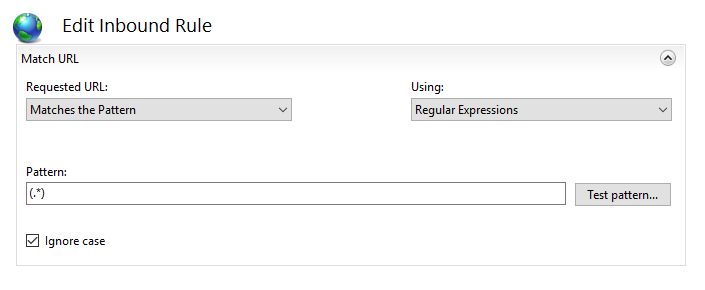
  7. In the Match URL section:
    - Select Matches the Pattern in the Requested URL drop-down menu
    - Select Regular Expressions in the Using drop-down menu
    - Enter the following pattern in the Match URL section: (.*)
    - Check the Ignore case box
    iisred3
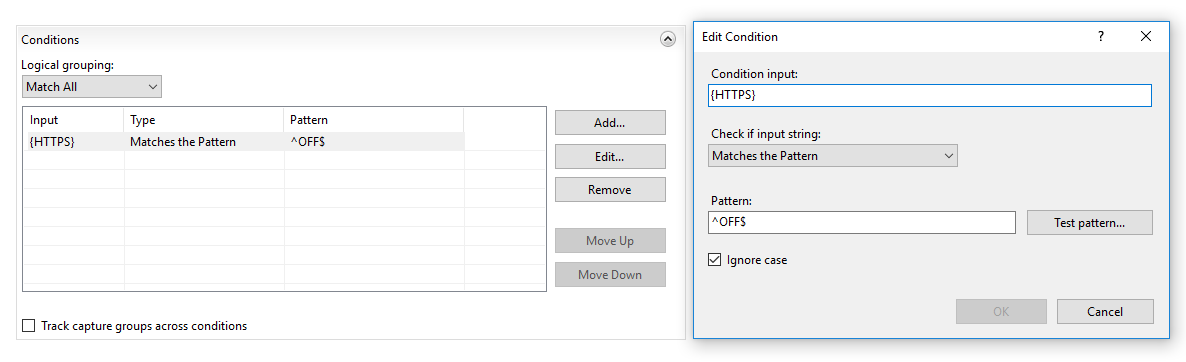
  8. In the Conditions section, select Match all under the Logical Grouping drop-down menu and press Add.
  9. In the prompted window:

    - Enter {HTTPS} as a condition input
    - Select Matches the Pattern from the drop-down menu
    - Enter ^OFF$ as a pattern
    - Press OK
    iisred4
  10. In the Action section, select Redirect as the action type and specify the following for Redirect URL:
    https://{HTTP_HOST}{REQUEST_URI}
  11. Un-check the Append query string box.
  12. Select the Redirection Type of your choice. The whole Action section should look like this:
    iisredirect5
  13. NOTE: There are 4 redirect types of the redirect rule that can be selected in that menu:
    - Permanent (301) – preferable type in this case, which tells clients that the content of the site is permanently moved to the HTTPS version. Good for SEO, as it brings all the traffic to your HTTPS website making a positive effect on its ranking in search engines.
    - Found (302) – should be used only if you moved the content of certain pages to a new place *temporarily*. This way the SEO traffic goes in favour of the previous content’s location. This option is generally not recommended for a HTTP/HTTPS redirect.
    - See Other (303) – specific redirect type for GET requests. Not recommended for HTTP/HTTPS.
    - Temporary (307) – HTTP/1.1 successor of 302 redirect type. Not recommended for HTTP/HTTPS.

    OPTION 2: Specify the Redirect Rule as https://{HTTP_HOST}/{R:1} and check the Append query string box. The Action type is also to be set as Redirect.
  14. Click on Apply on the right side of the Actions menu.
The IIS redirect can be checked by accessing your site via http:// specified in the URL. To make sure that your browser displays not the cached version of your site, you can use anonymous mode of the browser.
The rule is created in IIS, but the site is still not redirected to https://
Normally, the redirection rule gets written into the web.config file located in the document root directory of your website. If the redirection does not work for some reason, make sure that web.config exists and check if it contains the appropriate rule.
To do this, follow these steps:
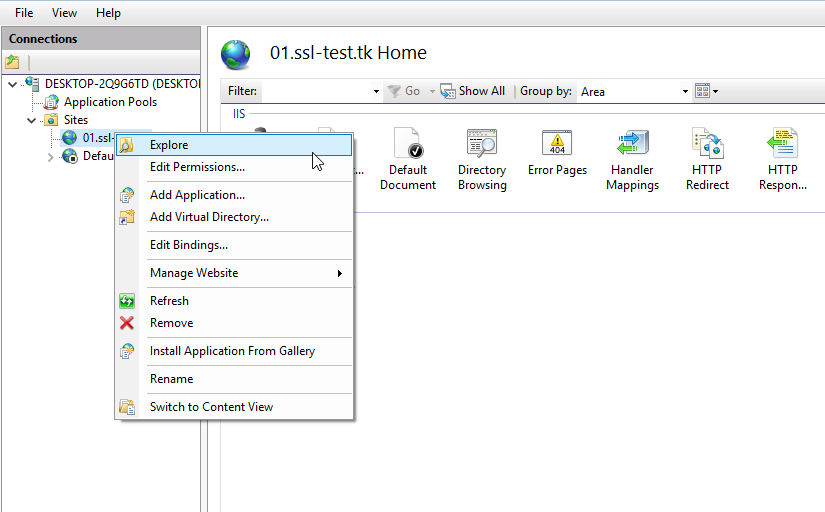
  1. In the sites list of IIS, right-click on your site. Choose the Explore option:
    iisred6
  2. Explore will open the document root directory of the site. Check if the web.config file is there.
  3. The web.config file must have the following code block:
    <configuration>
     <system.webServer>
     <rewrite>
     <rules>
     <rule name="HTTPS force" enabled="true" stopProcessing="true">
     <match url="(.*)" />
     <conditions>
     <add input="{HTTPS}" pattern="^OFF$" />
     </conditions>
     <action type="Redirect" url="https://{HTTP_HOST}{REQUEST_URI}" redirectType="Permanent" />
     </rule>
     </rules>
     </rewrite>
     </system.webServer>
    </configuration>
  4. If the web.config file is missing, you can create a new .txt file, put the aforementioned code there, save and then rename the file to web.config.