In this chapter, we will be covering fluent NHibernate. Fluent NHibernate is another way of mapping or you can say it is an alternative to NHibernate's standard XML mapping files. Instead of writing XML (.hbm.xml files)documents. With the help of Fluent NHibernate, you can write mappings in strongly typed C# code.
- In Fluent NHibernate mappings are compiled along with the rest of your application.
- You can easily change your mappings just like your application code and the compiler will fail on any typos.
- It has a conventional configuration system, where you can specify patterns for overriding naming conventions and many other things.
- You can also set how things should be named once, then Fluent NHibernate does the rest.
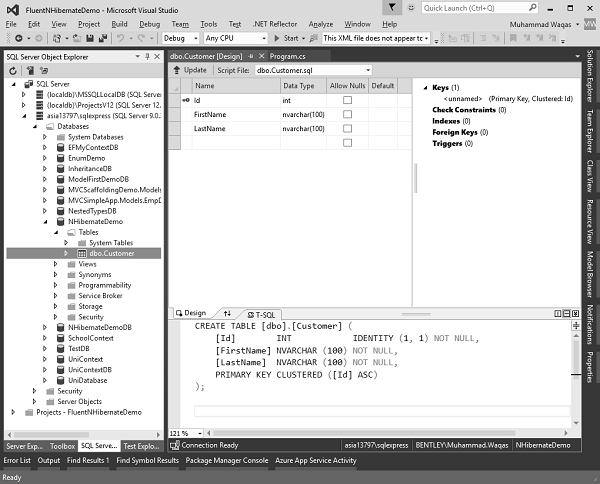
Let’s have a look into a simple example by creating a new console project. In this chapter, we will use a simple database in which we have a simple Customer table as shown in the following image.

Install Fluent NHibernate
The first step is to start Fluent NHibernate is to install Fluent NHibernate package. So open the NuGet Package Manager Console and enter the following command.
PM> install-package FluentNHibernate
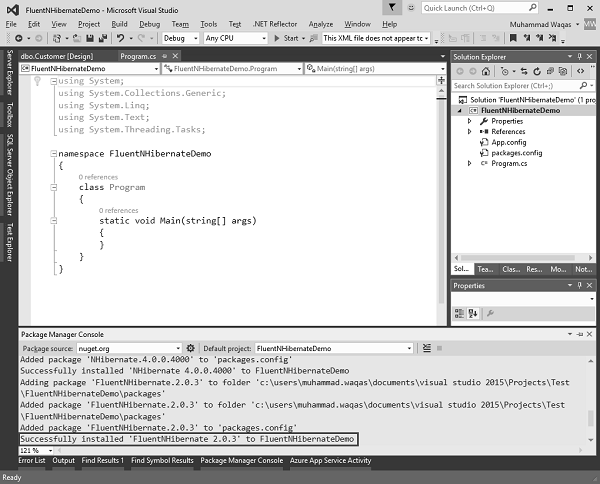
Once it is installed successfully, you will see the following message.

Let’s add a simple model class of Customer and the following program shows the Customer class implementation.
using System;
using System.Collections.Generic;
using System.Linq;
using System.Text;
using System.Threading.Tasks;

namespace FluentNHibernateDemo {
   class Customer {
      public virtual int Id { get; set; }
      public virtual string FirstName { get; set; }
      public virtual string LastName { get; set; }
   }
}
Now we need to create Mappings using fluent NHibernate, so add one more class CustomerMap in your project. Here is the implementation of the CustomerMap class.
using FluentNHibernate.Mapping;
using System;
using System.Collections.Generic;
using System.Linq; using System.Text;
using System.Threading.Tasks;

namespace FluentNHibernateDemo {
   class CustomerMap : ClassMap<Customer> {
      public CustomerMap() {
         Id(x => x.Id);
         Map(x => x.FirstName);
         Map(x => x.LastName);
         Table("Customer");
      }
   }
}
Let’s add another class NHibernareHelper in which we will set different configuration settings.
using FluentNHibernate.Cfg;
using FluentNHibernate.Cfg.Db;
using NHibernate;
using NHibernate.Tool.hbm2ddl;

namespace FluentNHibernateDemo {

   public class NHibernateHelper {

      private static ISessionFactory _sessionFactory;

      private static ISessionFactory SessionFactory {
         get {
            if (_sessionFactory == null)
            InitializeSessionFactory(); return _sessionFactory;
         }
      }

      private static void InitializeSessionFactory() {
         _sessionFactory = Fluently.Configure()

         String Data Source = asia13797\\sqlexpress;
         String Initial Catalog = NHibernateDemoDB;
         String Integrated Security = True;
         String Connect Timeout = 15;
         String Encrypt = False;
         String TrustServerCertificate = False;
         String ApplicationIntent = ReadWrite;
         String MultiSubnetFailover = False;

         .Database(MsSqlConfiguration.MsSql2008 .ConnectionString(
            @"Data Source + Initial Catalog + Integrated Security + Connect Timeout
            + Encrypt + TrustServerCertificate + ApplicationIntent +
            MultiSubnetFailover") .ShowSql() )

         .Mappings(m => m.FluentMappings
         .AddFromAssemblyOf<Program>())
         .ExposeConfiguration(cfg => new SchemaExport(cfg)
         .Create(true, true))
         .BuildSessionFactory();
      }

      public static ISession OpenSession() {
         return SessionFactory.OpenSession();
      }
   }
}
Now let’s move to the Program.cs file in which we will start a session and then create a new customer and save that customer to the database as shown below.
using System;
using System.Collections.Generic;
using System.Linq;
using System.Text;
using System.Threading.Tasks;

namespace FluentNHibernateDemo {
   class Program {

      static void Main(string[] args) {

         using (var session = NHibernateHelper.OpenSession()) {

            using (var transaction = session.BeginTransaction()) {
               var customer = new Customer {
                  FirstName = "Allan",
                  LastName = "Bomer"
               };

               session.Save(customer);
               transaction.Commit();
               Console.WriteLine("Customer Created: " + customer.FirstName + "\t" +
                  customer.LastName);
            }

            Console.ReadKey();
         }
      }
   }
}
Let’s run your application and you will see the following output.
if exists (select * from dbo.sysobjects where id = object_id(N'Customer') and
   OBJECTPROPERTY(id, N'IsUserTable') = 1) drop table Customer

create table Customer (
   Id INT IDENTITY NOT NULL,
   FirstName NVARCHAR(255) null,
   LastName NVARCHAR(255) null,
   primary key (Id)
)

NHibernate: INSERT INTO Customer (FirstName, LastName) VALUES (@p0, @p1);
   select SCOPE_IDENTITY();@p0 = 'Allan' [Type: String (4000)],
   @p1 = 'Bomer' [Type: String (4000)]
   Customer Created: Allan Bomer
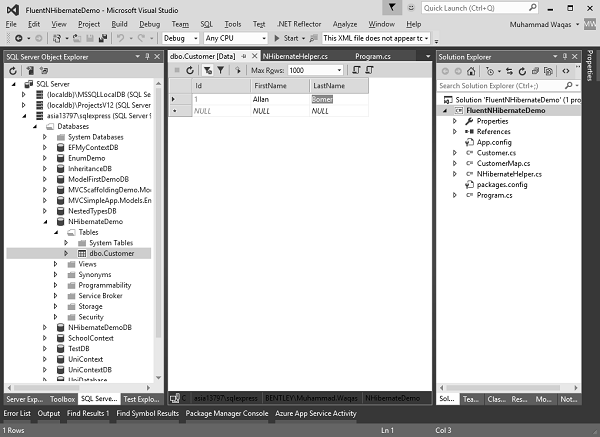
As you can see the new customer is created. To see the customer record, let’s go to the database and see the View Data and you will see that 1 Customer is added.

No comments:
Post a Comment
Note: only a member of this blog may post a comment.