Our friends in Azure have just announced the GA of Azure File Storage, which allows fully managed file shares in the cloud. https://azure.microsoft.com/en-us/blog/azure-file-storage-now-generally-available/
One common question is "can I host my IIS web content in the cloud using Azure Files”? The answer is yes you can! :)
In general, Web Apps is the recommended and best way to create and deploy Web Applications in Azure.
We also recognize that customers may choose to host their web servers on IaaS VMs. Until now, for these scenarios, the web content always had to be hosted locally on the VM. With Azure File Storage, the web content can now be stored independently of the web server.
One advantage of using Azure File Storage in this way is if you have a ‘farm’ of web servers accessing content in a centralized location (previously, you would have to copy the content across all the VMs and keep them sync).
This blog entry walks you through the step by step of how to configure IIS to work with Azure Files.
Basics / Prerequisites
This walkthrough assumes that you already have an Azure storage account and that the Azure Files share is already setup (https://azure.microsoft.com/en-us/documentation/articles/storage-dotnet-how-to-use-files/)
For the purpose of this walkthrough we have already setup a share called ‘webshare1’ and a storage account as follows
| Account Name | youraccnt123 |
| File Endpoint | https://youraccnt123.file.core.windows.net |
| Account Key 1 | someVeryLongStorageAccountKeyxxxxyyyyyzzzz1111222233334444555566667777888899990000AAABB== |
Whereby the share would be accessed from the command line as follows,
net use <drive-letter>: \\<storage-account-name>.file.core.windows.net\<share-name> /u:<storage-account-name> <storage-account-key> e.g.net use * \\ youraccnt123.file.core.windows.net\webshare1 /u: youraccnt123 someVeryLongStorageAccountKeyxxxxyyyyyzzzz1111222233334444555566667777888899990000AAABB==IIS Setup
Creating local user
Azure Files does not currently support Windows Authentication, which means on the Web Server (e.g. the Azure VM hosting IIS that will be accessing the Azure file share) we will need to create a local user that maps to the storage account user.
From Computer Management UI: 'Local Users and Groups' -> select Users -> right click -> 'New User'
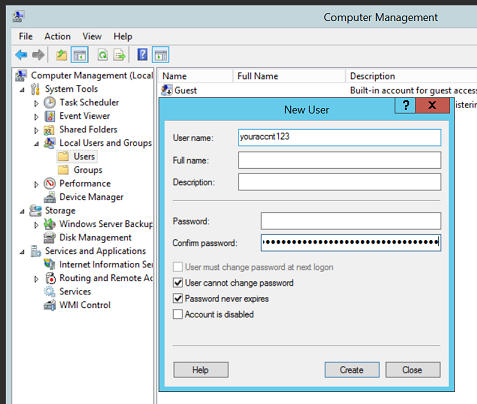
In this case I have ‘User cannot change password’ and ‘Password never expires’ checked, but this is entirely your decision. You can also script the creation of the local user e.g. using PowerShell. By default, Windows has a restriction of 20 characters for the user name. Technically this limit can be changed in Active Directory but for the purpose of integrating IIS with Azure Files we should aim to keep it at 20. This means your Azure storage account name should also be a max of 20 chars.
Add user to IIS_IUSRS group
Add the newly created local user to the local IIS_IUSRS group.
From Computer Management UI: 'Local Users and Groups' -> select Groups -> IIS_IUSRS
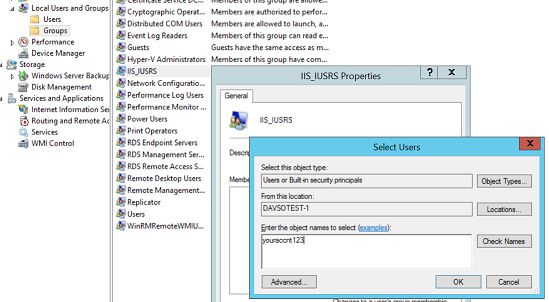
You can also accomplish this via command line e.g. net localgroup IIS_IUSRS youraccnt123 /add
Shared Configuration
IIS has a ‘shared centralized global configuration’ feature, whereby multiple servers in a Web Farm can share the same configuration settings by hosting the files on an UNC share. Some more information on shared configuration here: http://www.iis.net/learn/manage/managing-your-configuration-settings/shared-configuration_264
Similarly, with Azure Files, we can use the same shared configuration files on the Azure share. If you are not using Shared Configuration, then you can omit this section, otherwise read on.
Exporting files and keys
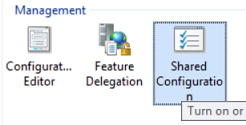
The first step of setting up shared configuration is to export the configuration file and keys. In the UI, open the Shared Configuration option under Management, select ‘Export Configuration’ (far right in Actions pane).
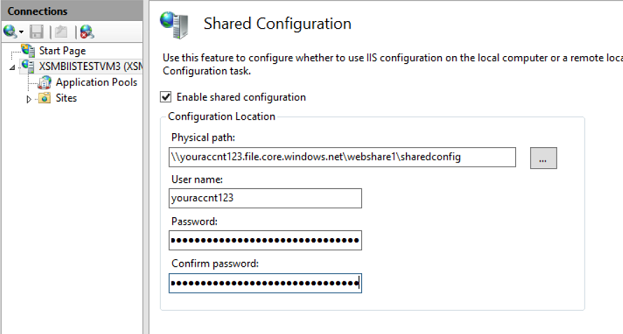
One way is to export the files locally and then you copy to the Azure file share. Another way is to set the physical path to point to your Azure file share and set credentials using your newly created local user, that maps to the storage account.
If you are writing to the remote share and get an error “Cannot write to the specified path. Make sure that the path and credentials are valid” (and assuming you gave the correct credentials) then you could be hitting a bug that has been fixed on newer OS releases such as Windows 10 and Windows Server 2016. If you hit this issue then export locally, then copy to the Azure file share.
At this point we should have a directory on the Azure file share (e.g. \\youraccnt123.file.core.windows.net\webshare1\sharedconfig) that contains the following files:
- administration.config
- applicationHost.config
- configEncKey.key
Enabling Shared Configuration
Once the configuration files are exported, you can enable shared configuration and point the physical path to the Azure file share (in UNC format), using the local user/password that we created above.
The UI will also prompt you for the password for the encryption key (you used when exporting the keys). You may encounter a couple of message boxes with the error “object reference not set to an instance of an object”. You can dismiss them both by clicking on OK and ignore the error as the changes will actually be saved. The message box is a UI bug we will look into fixing in future versions.
Configuring Application Pools
Create a new Application Pool using the identity of the local user that maps to the storage account.
To do this in the IIS management UI:
- Create a new Application Pool (right click on Application Pools -> Add New Application Pool) and give it a name e.g. AzFilePool
- Select the newly created Application Pool -> Advanced Settings (far right pane under Actions) -> Identity -> Custom Account -> Set -> Enter user/password credentials of the local user (that maps to the storage account).
Changing physical path to point to Azure file share
In IIS configuration, there are multiple places where traditionally you would point to a local or UNC share, you should be able to point to the Azure file share.
Whether you are configuring Web Site, Application or FTP physical path, the steps are very similar.
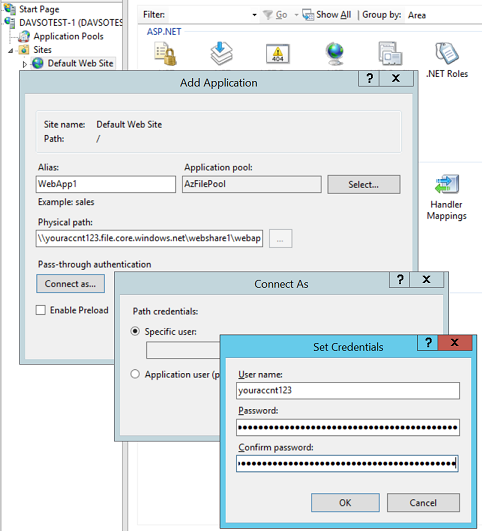
- Physical path to point to the Azure file share in UNC share – e.g. \\youraccnt123.file.core.windows.net\webshare1
- Note – must be UNC format! Using mapped drive (e.g. Z:\) will not work!!! (mapped drive is only for the local user session)
- In ‘Connect as’, specify the user name/password of the local user that we created above (where user name/password is the same as the storage account/key)
- If there is a ‘Test Settings’ option then ‘Authentication’ should pass (ignore the ‘Authorization’ error).
Example of Application setting:
Receiving URL Too Long error?
If you are seeing HTTP 414 ‘URL Too Long’ errors and assuming that your URL really is not too long, could indicate a misconfiguration issue (the ‘URL too long’ error in this case is a bit misleading).
You may see this if you are accessing static content (such as a html page or image) AND you are using anonymous authentication AND you didn’t configure an appropriate anonymous identity (e.g. ‘Connect As’ for the application is set to Application User/Pass Thru, but anonymous authentication setting is set to IUSR).
In this case you can either set ‘Connect As’ to the specific local user (that maps to the storage account), or you need to configure anonymous authentication user identity with the local user (that maps to the storage account).
Setting up FTP application
In the same way that IIS can operate as a FTP server by referencing content on an UNC share, we can similarly point to an Azure file share.
Doing this from the Inetmgr UI is a little bit different than for configuring web applications.
First we set the physical path.
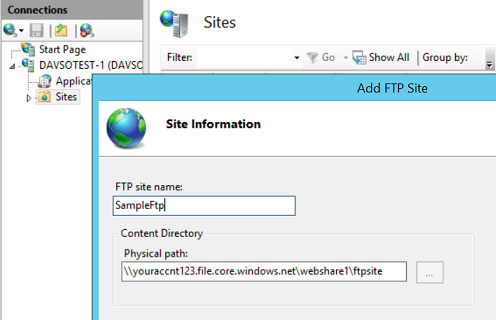
But from this UI pane there is no way to specify credentials. We need to go back through Basic Settings and then ‘Connect as’.
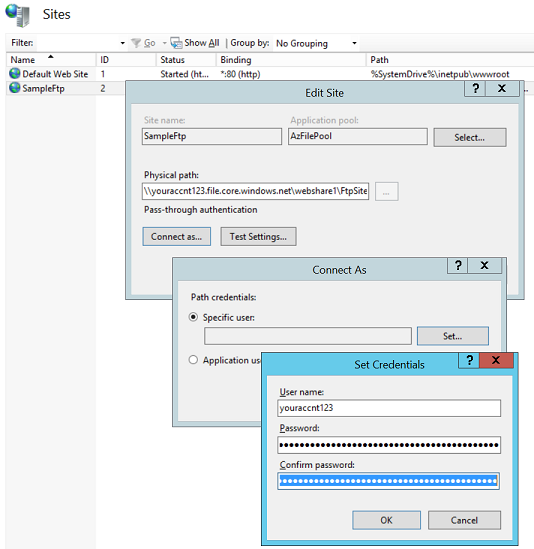
For FTP Site to work with Azure Files, will need to specify ‘Connect as’ credentials, even if you are running under a custom Application Pool (unlike with Web Application, where ‘pass through’ would succeed).
Considerations for ASP.NET
CAS (Code Access Security) Permissions
If you have custom .NET assemblies on the Azure File share that are used by the ASP.NET application then you will need to configure .NET security policy to trust the Azure file share.
caspol -m -ag 1 -url file://\\youraccnt123.file.core.windows.net\yourshare\* FullTrustImpersonation/Delegation Scenarios
Azure Files does not currently support windows authentication nor ACLs on file shares. Therefore, any Asp.Net scenarios involving impersonation to access file shares will not work, as all access to the file share will be via the storage account user.
Considerations for deploying large ASP.NET applications
Azure Regions
Have your IIS VMs in the same Azure region as your Storage.
Otherwise, having your IIS VMs in one region and your Azure File share content in a different geographic region will undoubtedly increase latency and impact performance, particularly for large websites with lots of content. Of course this applies to all web content, not just ASP.NET applications.
Compilation
If you have a very large ASP.NET web application in the order of thousands of aspx files then you should consider precompiling your application. If you do not precompile (or this is not an option for you) then ASP.NET will automatically compile your code the 1st time a resource is requested.
For large applications hosted on any kind of network share (including Azure file shares), this could have a potential performance impact during startup since ASP.NET will need to access the .aspx and source files in order to perform the compilation. If you have a ‘web farm’ configuration with multiple servers, then the performance impact could become more prominent as each server would have to repeat the compilation step.
Roslyn Compiler
‘Roslyn’ is a new .NET compiler platform from Microsoft that can make a difference in reducing compilation time, particularly for large complex applications. The following blog explains more about Roslyn and ASP.NET:
The above blog refers to an earlier preview version of Roslyn, which is now officially released with version 1.0.0, though much of the blog content is still relevant. Visual Studio 2015 also comes with Roslyn built in, so creating a new web application with Visual Studio 2015 will automatically leverage Roslyn.
Every application and scenario is different, so you will need to experiment to see if this approach works better for you.
No comments:
Post a Comment
Note: only a member of this blog may post a comment.